
Digital impressions have made restorative workflows faster, but they have not removed the need for laboratory judgment.
From the clinic side, an intraoral scan may look clean. The margin appears visible. The bite has aligned. The model rotates smoothly on screen. The case feels ready to send.
From the laboratory side, we often see more questions inside the file.
At HeZhan Dental Laboratory, many production risks show up before the technician starts CAD design. The file may open without an error message, but the data can still leave uncertainty around the margin, bite, contact area, material space, implant position, or clinical instructions.
The restoration will follow the information in the file. If the file contains missing, distorted, or reconstructed data, the final result may require adjustment even when the design and manufacturing steps are handled with care.
This is why we review digital cases before design.
What Happens After the Scan Reaches the Laboratory?
Once a digital case arrives at the laboratory, we do not treat the STL file as a finished instruction.
A reliable digital workflow begins with case evaluation.
Before CAD design, the laboratory team reviews the file and asks practical questions:
- Can we identify the preparation margin with confidence?
- Does the scan cover all required areas?
- Does the bite relationship match a realistic occlusion?
- Are the adjacent contacts usable for design?
- Is there enough clearance for the selected material?
- Are implant scan bodies captured with enough detail?
- Do the clinical notes explain the dentist’s expectations?
An imperfect scan can still be usable. Small limitations do not always require a rescan. The key is knowing which limitations the technician can manage and which ones may affect fit, occlusion, contact, esthetics, or implant accuracy.
If the file supports the restoration, we proceed.
If the file creates uncertainty in a critical area, early communication helps prevent larger corrections later. A focused rescan before design is usually more efficient than chairside modification after production.
This is where a good laboratory adds value. The lab is not only manufacturing the restoration. The lab is checking whether the digital information can support a predictable result.
1. The Margin Looks Clean, But the Finish Line Is Not Readable
One pattern we see during digital case review is a margin that looks smooth at first glance, but becomes unclear when the technician zooms in.
The most common causes are tissue coverage, moisture, blood, shadow, or scan noise around the gingival area. The scanner records the visible surface. It cannot capture the finish line if soft tissue blocks it.
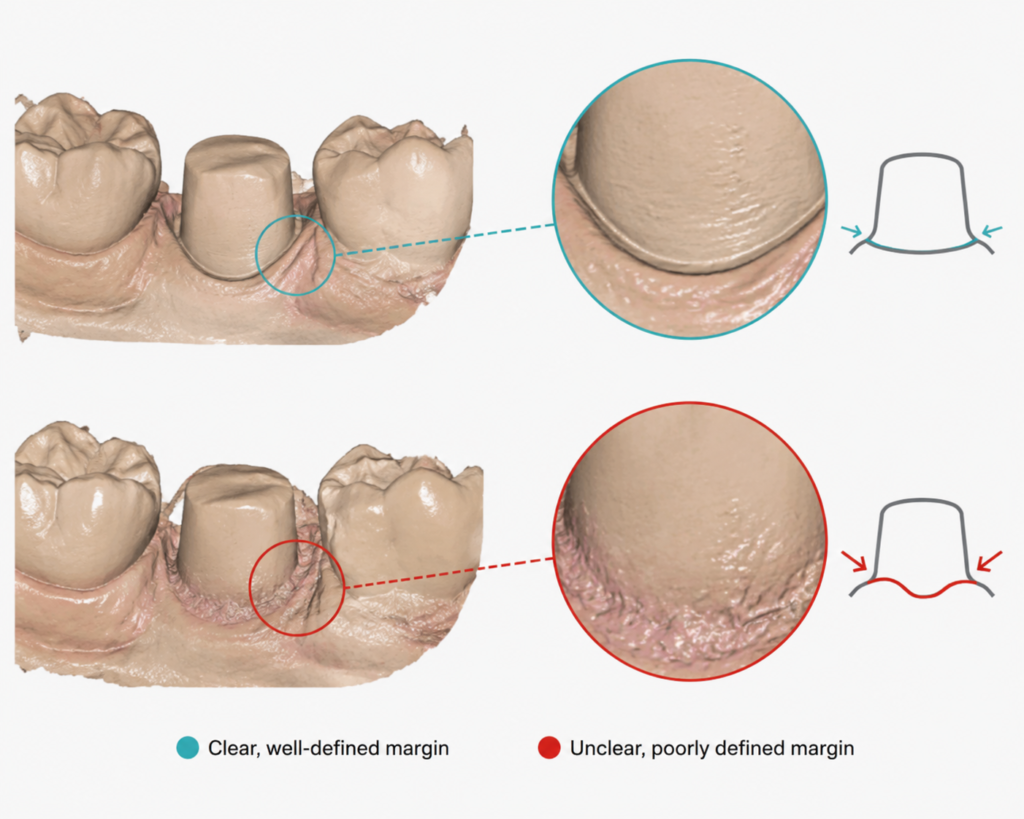
In some cases, the software creates a smooth-looking surface where the true margin was not captured. This may look acceptable on the clinic screen, but the technician still has to decide where the crown should end.
That decision affects marginal fit.
If the margin data is weak, the restoration may have seating resistance, an over-contoured edge, or an open margin. The problem began before design, at the point where the file failed to show the true preparation boundary.
From the lab side, a usable margin scan shows a continuous finish line with separation between tooth structure and soft tissue. The scan does not need to look beautiful. It needs to show the edge.
2. Tissue Retraction Problems Show Up in the File
We often receive scans where the preparation itself is acceptable, but the tissue management did not give the scanner enough access.
This happens most around equigingival and subgingival margins. It also happens in interproximal areas, where the margin can sit lower than the facial or lingual side.
Digital scanning does not displace tissue the way impression material can. The scanner records line of sight. If the tissue is in the way, the file carries that limitation into the lab.
When we see tissue sitting over the finish line, we cannot solve the issue with CAD skill. We can adjust contours, margins, and cement space, but we cannot accurately design a restoration based on reconstructed data that does not represent the actual clinical anatomy.
For clinics, this means tissue control is part of the digital impression. Retraction, moisture control, and a quick scan review before submission reduce many margin-related risks.
3. The Bite Looks Aligned, But the Occlusal Relationship Does Not Hold Up
Bite registration is one of the areas where the clinic screen can create false confidence.
On screen, the bite may appear properly aligned, but visual alignment does not confirm functional accuracy. The software can create a closed relationship based on the reference information it has available. If the captured bite does not represent the patient’s true occlusion, the restoration will be designed according to the wrong relationship.
From the laboratory perspective, we look for signs that the bite record may not support the case:
- Unrealistic intersections between upper and lower arches
- Missing contacts where contact should exist
- Artificial gaps in areas that should close
- Bite data captured from too small an area
- Strong dependence on automatic alignment
- Occlusal contacts that do not match the tooth anatomy or wear pattern
These issues matter because the technician designs to the file, not to the patient sitting in the chair.
If the file shows a false closure, the crown may return high. If the scan shows artificial space, the restoration may be designed too light in occlusion. If the bite only has limited reference data, the software may choose an alignment that looks clean but does not match the mouth.
In our review process, we do not treat a visually closed bite as enough. We check whether the occlusal relationship makes sense across the scan. For posterior crowns, we look at contact position and opposing anatomy. For bridges or larger cases, we look for broader stability across the arch.
When the bite record creates risk, we prefer to communicate before CAD design. A corrected bite scan gives the technician a better foundation than trying to adjust occlusion around questionable data.
4. Adjacent Contacts Often Explain Contact Adjustments
Open or light contacts are frustrating because the restoration may look correct in CAD and still disappoint at delivery.
During review, we often look beyond the prepared tooth. The adjacent teeth tell us a lot.
If the adjacent contact surface is pointed, rough, undercut, or not parallel to the path of insertion, the lab has less control over the final contact. The technician can design a contact, but the shape of the neighboring tooth may make the crown harder to seat or easier to leave light.
A clean scan of a poor contact area still creates risk.
This is why we pay attention to adjacent surfaces before design. Broad, smooth, readable contact areas give the technician a better foundation. Irregular contacts invite guesswork.
For clinicians, a small adjustment before the final scan can sometimes prevent a case correction. From the lab side, we can design better contacts when the neighboring anatomy supports the design.
5. Overscanning Can Create a Complete-Looking But Distorted File
Another pattern we see is the heavily patched scan.
The clinician may return to the same area several times to fill missing spots. The model looks more complete after that, but the file may carry stitching errors from repeated passes.
This matters around preparations, contacts, bite areas, and full-arch scans. The scanner software has to combine many images into one mesh. If those images do not align with enough precision, the final surface may shift.
The lab may notice this as strange contact behavior, odd surface texture, distorted anatomy, or an occlusal relationship that does not feel consistent across the arch.
More scan data does not always give the lab better information. A controlled scan path gives us a file we can trust more than a surface rebuilt through repeated patching.
6. Mesh Repair Can Hide Missing Clinical Detail
We sometimes see scans where the surface looks too smooth in areas that should show more detail.
This can happen when the scanner software fills holes or repairs incomplete mesh areas. Around non-critical tissue surfaces, this may not affect the case. Around the preparation margin, occlusal anatomy, interproximal area, or scan body, it can affect the restoration.
The issue is location.
If the reconstructed area sits on a critical design surface, the technician cannot know whether the geometry matches the patient’s mouth. The lab can proceed only when the clinical risk is acceptable. If the affected area controls fit, contact, or occlusion, we prefer to ask for a targeted rescan.
A short rescan gives the technician real clinical information instead of a repaired surface.
7. Implant Scan Bodies Need More Than a Visible Shape
Implant cases reveal scan errors that may not matter in simple tooth-supported cases.
During implant case review, we check whether the scan body is fully seated, whether the surface is captured from enough angles, and whether the surrounding tissue and occlusion give enough context for design.
A scan body may appear in the file, but still lack enough detail for reliable positioning. If the scan body data is distorted, the implant position transferred to CAD may be wrong.
For single implant crowns, this can affect contact, occlusion, emergence profile, and seating. For multi-unit implant cases, the risk increases because small scan errors can accumulate across the arch.
Full-arch implant scans require special attention. Edentulous areas provide fewer landmarks for stitching, and implant frameworks need passive fit. When we see signs of scan drift or weak scan body capture, we would rather communicate before design than force the case forward.
8. Gingival Data Affects the Final Shape of the Restoration
Many digital cases focus on teeth and miss the soft tissue story.
Gingival information matters for anterior crowns, implant crowns, pontics, veneers, and provisional-to-final workflows. The technician needs to understand how the restoration should leave the tissue and support the emergence profile.
If the scan captures the tooth but gives little information about the gingiva, the lab may have to make conservative design choices. This can affect esthetics, cleansability, and tissue support.
Photos, provisional scans, and clear gingival capture give the technician more context. In esthetic and implant cases, this information can change the final contour of the restoration.
9. Material Selection Changes What the Lab Needs to See
The same scan may support one material well and leave another material with limited room.
This is why we review scan quality together with material choice. Zirconia, lithium disilicate, metal restorations, implant crowns, and removable prosthetics all ask different things from the file.
For zirconia restorations, we look at reduction space, connector design, occlusal clearance, and functional load. A strong material still needs enough room for proper contour and thickness.
For lithium disilicate restorations, we pay closer attention to esthetic zone details, preparation design, margin quality, stump shade, and photos. The lab needs enough visual information to manage value, translucency, and final appearance.
For metal or porcelain-fused-to-metal restorations, we check clearance, margin form, and opposing occlusion. The framework design depends on enough space and a clear path of insertion.
For implant restorations, material choice connects directly to emergence profile, occlusal design, screw access, soft tissue contour, and passive fit.
For removable prosthetics, the scan needs to show tissue, ridge anatomy, extension areas, bite information, and any remaining teeth with enough clarity for design.
A technically acceptable scan may still need more information if the chosen material has specific space, strength, or esthetic requirements. This is one reason HeZhan reviews the scan and the prescription together instead of treating the file as an isolated 3D model.
10. The Scan Is Only One Part of the Digital Case
A technically accurate scan does not guarantee a successful restoration if the laboratory does not understand the clinical goal.
We often receive cases where the scan quality is acceptable, but the instructions leave too much room for interpretation. The file may show the preparation, adjacent teeth, and bite. It may not explain the material choice, esthetic expectation, shade situation, patient habit, or reason behind the treatment plan.
That missing context can affect the final result.
From the laboratory side, we need more than surface geometry. We need to know what the clinician wants the restoration to achieve.
Useful case information includes:
- Material preference
- Tooth number and restoration type
- Shade and stump shade when relevant
- Intraoral photos for esthetic cases
- Occlusal concerns
- Bruxism or heavy function
- Limited clearance
- Implant system and scan body details
- Provisional design or emergence profile references
- Areas the clinician wants us to evaluate before design
A crown can fit the scan and still miss the clinical expectation.
For example, a posterior crown with limited clearance may need a different material or contour strategy. An anterior crown may need photos to match value and translucency. An implant crown may need soft tissue information to support the emergence profile. A bruxism case may need stronger material choices and occlusal design decisions before production begins.
This is where communication becomes part of the digital workflow.
At HeZhan Dental Laboratory, we read the scan together with the case notes. If the file is clear but the clinical intention is missing, we may ask for more information before design. That conversation helps prevent restorations that are technically acceptable in CAD but not aligned with the dentist’s goal.
How HeZhan Uses Scan Review to Reduce Production Risk
At HeZhan Dental Laboratory, our digital case review focuses on one question:
Does this file give the technician enough reliable information to design the restoration?
To answer that, we check the margin, preparation, adjacent contacts, bite, mesh quality, implant data, gingival information, material requirements, and case notes before design begins.
An imperfect scan does not automatically stop the case. Many files have small limitations that the technician can manage. We focus on whether the limitation affects a critical part of the restoration.
If the file supports the case, we proceed.
If we see a concern that may affect fit, occlusion, contacts, esthetics, or implant accuracy, we communicate with the clinic before production. Sometimes the answer is a targeted rescan. Sometimes the answer is a photo, a material confirmation, an implant detail, or a clearer note about the clinical goal.
That judgment comes from laboratory experience.
A scanner can create the digital file. The laboratory has to decide whether the file is ready to become a restoration.
Final Thoughts
Most digital case problems do not come from one dramatic failure. They often come from small details that looked harmless at the chair.
A margin hidden by tissue. A bite that aligned too early. A contact area with weak detail. A scan body captured from too few angles. A material choice without enough clearance. A case note left blank.
From the laboratory side, these patterns are visible before CAD design if someone takes the time to review the file.
HeZhan Dental Laboratory helps clinics improve digital outcomes by checking files before production and communicating early when the data needs attention. Better restorations start with better information, and better information comes from both clinical technique and laboratory review.